
INTRODUCTION
OpenVZ (Photo credit: Wikipedia)
With OpenVZ you can create multiple Virtual Private Servers (VPS) on the same hardware, similar to Xen and the Linux Vserver project. OpenVZ is the open-source branch of Virtuozzo, a commercial virtualization solution used by many providers that offer virtual servers. The OpenVZ kernel patch is licensed under the GPL license, and the user-level tools are under the QPL license.In OpenVZ, the virtualization is performed based on a single host operating system. Only the same instance of the host Operating System can be used on the virtual Servers as guest Operating Systems.
Installing OpenVZ
In order to install OpenVZ, we need to add the OpenVZ repository to yum:
#cd /etc/yum.repos.d
#wget http://download.openvz.org/openvz.repo
#rpm –import http://download.openvz.org/RPM-GPG-Key-OpenVZ

Now open openvz.repo…
#vi openvz.repo
[openvz-kernel-rhel6]
name=OpenVZ RHEL6-based kernel
#baseurl=http://download.openvz.org/kernel/branches/rhel6-2.6.32/current/
mirrorlist=http://download.openvz.org/kernel/mirrors-rhel6-2.6.32
enabled=1
gpgcheck=1
gpgkey=http://download.openvz.org/RPM-GPG-Key-OpenVZ
[openvz-kernel-rhel5]
name=OpenVZ RHEL5-based kernel
#baseurl=http://download.openvz.org/kernel/branches/rhel5-2.6.18/current/
mirrorlist=http://download.openvz.org/kernel/mirrors-rhel5-2.6.18
enabled=0
gpgcheck=1
gpgkey=http://download.openvz.org/RPM-GPG-Key-OpenVZ
and disable the [openvz-kernel-rhel5] repository (enabled=0) and enable the [openvz-kernel-rhel6] repository instead (enabled=1):

#yum search vzkernel
vzkernel.i686 : The Linux kernel
vzkernel.x86_64 : The Linux kernel
vzkernel-devel.i686 : Development package for building kernel modules to match the kernel
vzkernel-devel.x86_64 : Development package for building kernel modules to match the kernel
vzkernel-firmware.noarch : Firmware files used by the Linux kernel
vzkernel-headers.i686 : Header files for the Linux kernel for use by glibc
vzkernel-headers.x86_64 : Header files for the Linux kernel for use by glibc
Pick one of them and install it as follows:
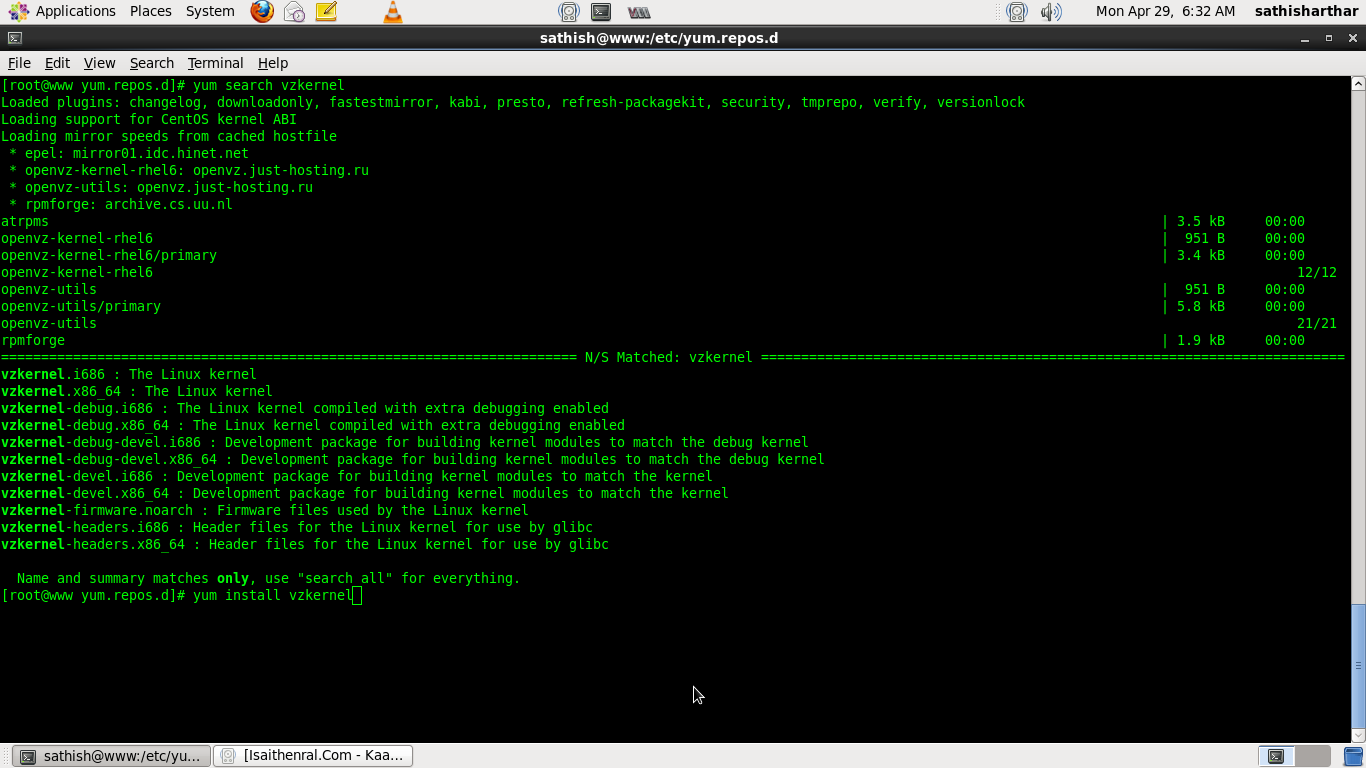
#yum install vzkernel
This should automatically update the GRUB bootloader as well. Anyway, we should open /boot/grub/menu.lst; the first kernel stanza should now contain the new OpenVZ kernel. Make sure that the value of default is 0 so that the first kernel (the OpenVZ kernel) is booted automatically instead of the default CentOS kernel.
#vi /boot/grub/menu.lst
#grub.conf generated by anaconda
#Note that you do not have to rerun grub after making changes to this file
#NOTICE: You have a /boot partition. This means that
#all kernel and initrd paths are relative to /boot/, eg.
#root (hd0,0)
#kernel /vmlinuz-version ro root=/dev/mapper/vg_www-lv_root
#initrd /initrd-[generic-]version.img
#boot=/dev/sda
default=0
timeout=5
splashimage=(hd0,0)/grub/splash.xpm.gz
hiddenmenu
title OpenVZ (2.6.32-042stab057.1)
root (hd0,0)
kernel /vmlinuz-2.6.32-042stab057.1 ro root=/dev/mapper/vg_www-lv_root rd_LVM_LV=vg_www/lv_root rd_NO_LUKS LANG=en_US.UTF-8 rd_NO_MD SYSFONT=latarcyrheb-sun16 crashkernel=auto KEYBOARDTYPE=pc KEYTABLE=de rd_LVM_LV=vg_www/lv_swap rd_NO_DM rhgb quiet
initrd /initramfs-2.6.32-042stab057.1.img
title CentOS (2.6.32-279.el6.x86_64)
root (hd0,0)
kernel /vmlinuz-2.6.32-279.el6.x86_64 ro root=/dev/mapper/vg_www-lv_root rd_LVM_LV=vg_www/lv_root rd_NO_LUKS LANG=en_US.UTF-8 rd_NO_MD SYSFONT=latarcyrheb-sun16 crashkernel=auto KEYBOARDTYPE=pc KEYTABLE=de rd_LVM_LV=vg_www/lv_swap rd_NO_DM rhgb quiet
initrd /initramfs-2.6.32-279.el6.x86_64.img

Now we install some OpenVZ user tools:
#yum install vzctl vzquota

Open /etc/sysctl.conf and make sure that you have the following settings in it:
#vi /etc/sysctl.conf
net.ipv4.ip_forward = 1
net.ipv4.conf.default.proxy_arp = 0
net.ipv4.conf.all.rp_filter = 1
kernel.sysrq = 1
net.ipv4.conf.default.send_redirects = 1
net.ipv4.conf.all.send_redirects = 0
net.ipv4.icmp_echo_ignore_broadcasts=1
net.ipv4.conf.default.forwarding=1

If you need to modify /etc/sysctl.conf, run
#sysctl -p
afterwards.
The following step is important if the IP addresses of your virtual machines are from a different subnet than the host system’s IP address. If you don’t do this, networking will not work in the virtual machines!
Open /etc/vz/vz.conf and set NEIGHBOUR_DEVS to all:
#vi /etc/vz/vz.conf
NEIGHBOUR_DEVS=all

#vi /etc/sysconfig/selinux
SELINUX=disabled
Finally, reboot the system:
#reboot
If your system reboots without problems, then everything is fine!
Run
#uname -r
2.6.32-042stab057.1


