
![]()
Before install postfix, remove sendmail from the server. Because sendmail is the default MTA in Redhat/CentOS.
#yum remove sendmail
The mail server should contain a valid MX record in the DNS server. So first we have to configure DNS server
#yum install bind
#mkdir /etc/named/zone
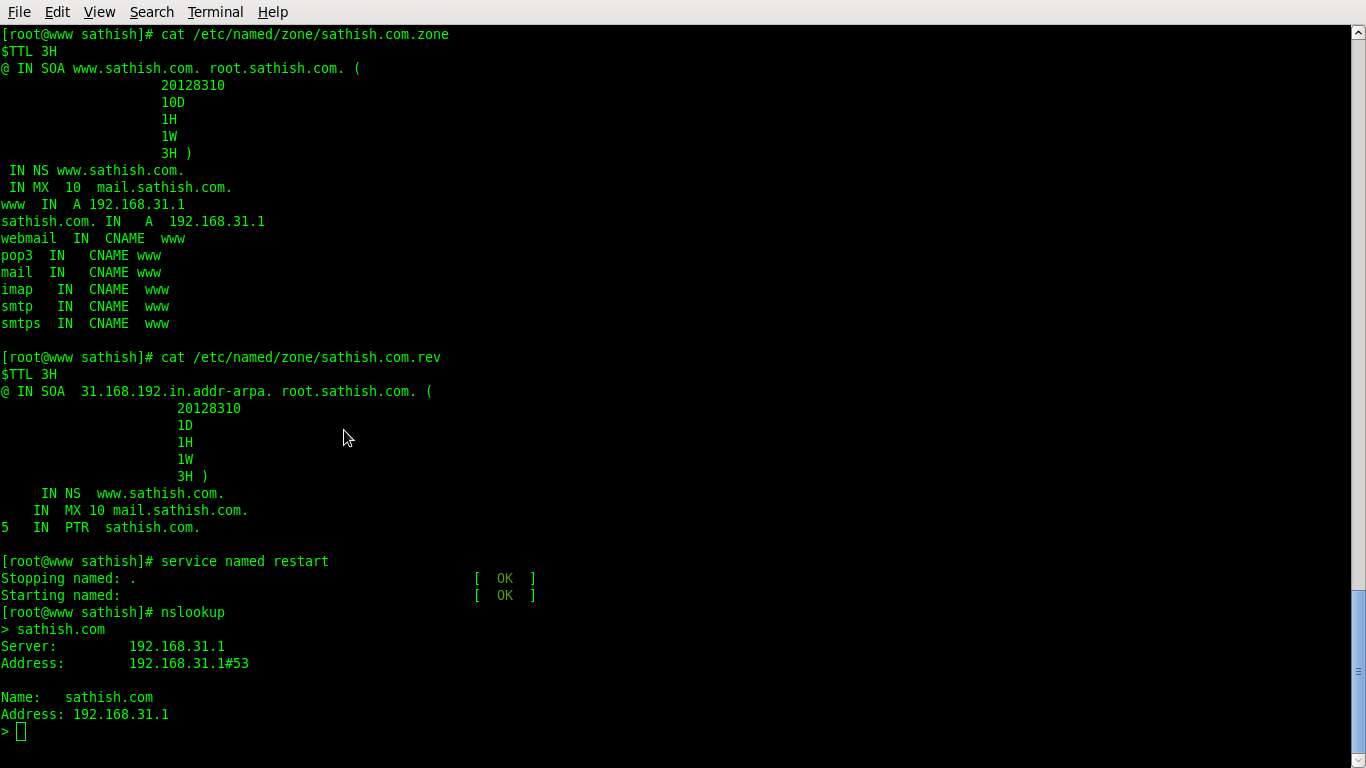
#vi /etc/named/zone/sathish.com.zone
$TTL 3H
@ IN SOA http://www.sathish.com. root.sathish.com. (
20128310
1D
1H
1W
3H )
IN NS http://www.sathish.com.
IN MX 10 mail.sathish.com.
www IN A 192.168.31.1
sathish.com. IN A 192.168.31.1
webmail IN CNAME www
pop3 IN CNAME www
mail IN CNAME www
imap IN CNAME www
smtp IN CNAME www
smtps IN CNAME www
#vi /etc/named/zone/sathish.com.rev
$TTL 3H
@ IN SOA 31.168.192.in.addr-arpa. root.sathish.com. (
20128310
1D
1H
1W
3H )
IN NS http://www.sathish.com.
IN MX 10 mail.sathish.com.
5 IN PTR sathish.com.
Add the zone file location in named configuration file
#vi /etc/named.conf
zone “sathish.com” IN {
type master;
file “/etc/named/zone/sathish.com.zone”;
};
zone “31.168.192.in.addr-arpa” IN {
type master;
file “/etc/named/zone/sathish.com.rev”;
};

#service named restart
#nslookup
>sathish.com
Server: 192.168.31.1
Address: 192.168.31.1#53
Name : sathish.com
Address: 192.168.31.1
Firewall and SELinux should be disabled
#service ip6tables stop
#service iptables stop
#chkconfig iptables off
#chkconfig ip6tables off
#vi /etc/selinux/config
SELINUX = disabled.
Basic Postfix configuration and preparation for SMTP AUTH
SMTP Authentication is advertised by the SMTP Authentication server, requires a client to authenticate, while finally both parties have to mutually accept and support the chosen authentication procedure. Originally invented as a Host-to-Host protocol, with SMTP Authentication, a User has to identify itself and after successful authentication, reception/transmission of his/her emails is granted.
#yum install postfix
# vi /etc/postfix/main.cf
mydomain = sathish.com
myhostname = mail.sathish.com
myorigin = $mydomain
inet_interfaces = all
inet_protocols = all
mydestination = localhost.$myhostname, localhost.$mydomain,localhost,$mydomain, mail.sathish.com
mynetworks = 192.168.31.0/24, 127.0.0.0/8
alias_maps = hash:/etc/aliases
alias_database = hash:/etc/aliases
# vi /etc/postfix/master.cf
#==========================================================================
# service type private unpriv chroot wakeup maxproc command + args
# (yes) (yes) (yes) (never) (50)
# ==========================================================================
smtp inet n – n – – smtpd
# /etc/init.d/postfix start
#ps axf | grep postfix
2206 ? Ss 0:00 /usr/libexec/postfix/master

#mail sathish
Subject: sathish from localhost
Test #1
.Cc:
#less /var/spool/mail/sathish
From [email protected] Fri May 15 21:09:54 2013
Return-Path: [email protected]
Delivered-To: [email protected]
Received: by mail.sathish.com (Postfix, from userid 0)
id 029E640789; Fri, 15 May 20133 21:09:53 +0100 (CET)
To: [email protected]
Subject: sathish from localhost
Message-Id: [email protected]
Date: Fri, 15 Mar 2002 21:09:53 +0100 (CET)
From: [email protected] (root)
Sending testmail from a remote host to a local user
The simpliest Mail client we can think of is a telnet client that connects to the SMTP port 25. We’ll be doing it the hard way, because we want to exclude side effects that might be introduced by other, more comfortable Mail clients.
Telnet session: Deliver mail to a local user
#telnet 192.168.31.1 25
220 mail.sathish.com ESMTP Postfix
EHLO arthar3.sathish.com
250-mail.sathish.com
250-PIPELINING
250-SIZE 10240000
250-VRFY
250-ETRN
250-XVERP
MAIL FROM:[email protected]
0 8BITMIM
250 Ok
RCPT TO:[email protected]
250 Ok
DATA
354 End data with <CR><LF>.<CR><LF>
Test from remote host
Test #2
250 Ok: queued as A0BD741E86
QUIT
221 Bye

So, we have just send our first mail from a remote host to a local user on the Postfix server. But what if we wanted Postfix not do deliver to a local user, but to relay the message for us to another user on a remote host
Delivering mail to a remote user (Relaying)
#telnet 192.168.31.1 25
220 mail.sathish.com ESMTP Postfix
EHLO arthar3.sathish.com
250-mail.sathish.com
250-PIPELINING
250-SIZE 10240000
250-VRFY
250-ETRN
250-XVERP
250 8BITMIME
mail from:[email protected]
250 Ok
rcpt to:[email protected]
250 Ok
Data
354 End data with <CR><LF>.<CR><LF>
Testmail relaying mail from [email protected] to [email protected]
Test #3
.
250 Ok: queued as 84BA64078A
Quit
221 Bye

Since our remote machine is part of the network defined in mynetworks it will be allowed to relay no matter if we configured SMTP AUTH correctly or not. This will not help us to prove, our configuration for SMTP AUTH works.
#vi /etc/postfix/main.cf
mynetworks = 127.0.0.0/8
#postfix reload
Let’s prove that our test setup will not allow us to relay messages. We telnet from our remote machine. Keep in mind that relaying means: Sending a message through Postfix to a remote user. The value we provide with RCPT TO: must not be a local user.
#telnet 192.168.31.1 25
220 mail.sathish.com ESMTP Postfix
EHLO arthar3.sathish.com
250-mail.sathish.com
250-PIPELINING
250-SIZE 10240000
250-VRFY
250-ETRN
250-XVERP
250 8BITMIME
MAIL FROM:[email protected]
250 Ok
RCPT TO:[email protected]
554 <[email protected]>: Recipient address rejected: Relay access denied
QUIT
221 Bye

Relay access denied
Postfix will not allow us to relay mails to remote users. Now that we’ve configured this we can go on and add SASL which will provide us with the functionality to relay even if we are not part of Postfix’ network
SMTP servers need to decide whether an SMTP client is authorized to send mail to remote destinations, or only to destinations that the server itself is responsible for. Usually, SMTP servers accept mail to remote destinations when the client’s IP address is in the “same network” as the server’s IP address.
SMTP clients outside the SMTP server’s network need a different way to get “same network” privileges. To address this need, Postfix supports SASL authentication With this a remote SMTP client can authenticate to the Postfix SMTP server, and the Postfix SMTP client can authenticate to a remote SMTP server. Once a client is authenticated, a server can give it “same network” privileges.
Postfix supports two SASL implementations: Cyrus SASL (SMTP client and server) and Dovecot SASL (SMTP server only). Both implementations can be built into Postfix simultaneously.
Configuring Dovecot SASL
Dovecot is a POP/IMAP server that has its own configuration to authenticate POP/IMAP clients. Communication between the Postfix SMTP server and Dovecot SASL happens over a UNIX-domain socket or over a TCP socket
#yum install dovecot
#vi /etc/dovecot/dovecot.conf
protocols = imap pop3
#vi /etc/dovecot/conf.d/10-auth.conf:
disable_plaintext_auth = no
auth_mechanisms = plain login
its provides plain and login as mechanisms for the Postfix SMTP server.
#vi /etc/dovecot/conf.d/10-master.conf:
unix_listener auth-userdb {
#mode = 0600
user = postfix
group = postfix
}
#service dovecot start
#dovecot –n

Configuring Cyrus SASL
#yum install cyrus-sasl-devel cyrus-sasl-gssapi cyrus-sasl-plain cyrus-sasl-md5
The Cyrus SASL package contains a Simple Authentication and Security Layer, a method for adding authentication support to connection-based protocols. To use SASL, a protocol includes a command for identifying and authenticating a user to a server and for optionally negotiating protection of subsequent protocol interactions. If its use is negotiated, a security layer is inserted between the protocol and the connection
#vi /etc/postfix/main.cf
smtpd_sasl_path = smtpd
As the Postfix SMTP server is linked with the Cyrus SASL library libsasl, communication between Postfix and Cyrus SASL takes place by calling functions in the SASL library.
The SASL library may use an external password verification service, or an internal plugin to connect to authentication backends and verify the SMTP client’s authentication data against the system password file or other databases.
|
authentication backend |
password verification service / plugin |
| /etc/shadow | saslauthd |
| PAM | saslauthd |
| IMAP server | saslauthd |
| Sasldb | sasldb |
| MySQL, PostgreSQL, SQLite | sql |
| LDAP | ldapdb |
Communication between the Postfix SMTP server (read: Cyrus SASL’s libsasl) and the saslauthd server takes place over a UNIX-domain socket in /var/run/saslauthd/ and waits for authentication requests
the Cyrus SASL library to contact saslauthd as its password verification service:
#vi /etc/sasl2/smtpd.conf:
pwcheck_method: saslauthd
mech_list: PLAIN LOGIN

#service saslauthd start
Do not specify any other in mech_list than PLAIN or LOGIN when using saslauthd! It can only handle these two mechanisms, and authentication will fail if clients are allowed to choose other mechanisms. Plaintext mechanisms (PLAIN, LOGIN) send credentials unencrypted
Testing saslauthd authentication
Cyrus SASL provides the testsaslauthd utility to test saslauthd authentication. The username and password are given as command line arguments. The example shows the response when authentication is successful:
#testsaslauthd -u username -p password
0: OK “Success.”

#telnet 192.168.31.1 imap
(telnet from a remote system to check the imap server)

#telnet 192.168.31.1 pop3
(telnet from a remote system to check the imap pop3)

Enabling SASL authentication and authorization in the Postfix SMTP server
#vi /etc/postfix/main.cf
smtpd_sasl_type = cyrus
smptd_sasl_local_domain =
smtpd_sasl_path = private/auth
smtpd_sasl_auth_enable = yes
smtpd_sasl_security_options = noanonymous
broken_sasl_auth_clients = yes
smtpd_recipient_restrictions = permit_sasl_authenticated, check_relay_domains
smtpd_client_restrictions = permit_mynetworks,permit_sasl_authenticated
smtpd_sasl_authenticated_header = yes

Always set at least the noanonymous option. Otherwise, the Postfix SMTP server can give strangers the same authorization as a properly-authenticated client.
#postfix reload
Check for SMTP AUTH support
we’ve have enabled SASL authentication in the configuration we need to verify that Postfix serves us the new feature. We check from a remote host and telnet to the Postfix server.
#telnet 192.168.31.1 25
220 mail.sathish.com ESMTP Postfix
EHLO sathish.com
250-mail.sathish.com
250-PIPELINING
250-SIZE 10240000
250-VRFY
250-ETRN
250-AUTH PLAIN LOGIN
250-AUTH=PLAIN LOGIN
250-XVERP
250 8BITMIME
Quit
221 Bye
250-AUTH PLAIN LOGIN 250-AUTH=PLAIN LOGIN
PLAIN LOGIN DIGEST is the order of the mechanisms in which a Mail client would try to authenticate to.
The AUTH=PLAIN statement is the one that broken clients need in order to recognize that they may use SMTP AUTH.
Check if SMTP AUTH works
we use PLAIN as mechanism we will have to pass our credentials plaintext. But hold, the credentials must be Base64 encoded, when we issue them. This can easily be done on our server. The basic command looks like this
#printf ‘testtesttestpass’ | mmencode
dGVzdAB0ZXN0AHRlc3RwYXNz
![]()
#telnet 192.168.31.1 25
220 mail.sathish.com ESMTP Postfix (1.1.7)
EHLO sathish.com
250-mail.sathish.com
250-PIPELINING
250-SIZE 10240000
250-VRFY
250-ETRN
250-AUTH PLAIN LOGIN
250-AUTH=PLAIN LOGIN
250-XVERP
250 8BITMIME
AUTH PLAIN dGVzdAB0ZXN0AHRlc3RwYXNz
235 Authentication successful
QUIT
221 Bye

Adding TLS support to Postfix
TLS (formerly SSL) stands for Transport Layer Security. Once this layer is established, it encrypts the communication between two hosts. If we use SMTP AUTH and the mechanisms PLAIN or LOGIN usernames and passwords are sent plaintext over the internet. This means that anyone could sniff the communication and read the passwords
When a TLS connection is being established the host establishing the connection has to validate itself. This is because someone else could hijack the connection and establish an encrypted connection. The remote host probably wouldn’t notice and pass sensible information. Therefore certificates are used to provide unique information that proves that the host encrypting the communication really is the host your client wants to talk to.
You are right when you argue that anyone even a hostile server could issue a certificate if it wasn’t for that little detail we left out: Each certificate that is issued provides information about an authority that will validate the cert that is issued when an TLS connection is established
#rpm -qa openssl
#vi /etc/pki/tls/openssl.cnf
edit countryName_default and 0.organizationName_default and provide values that make sense to your setting.
countryName_default          = IN
0.organizationName_default   = HOWTO
then uncomment organizationalUnitName_default and add a value. We will use Mail server in this HOWTO.
organizationalUnitName_default = Mailserver
add the lines commonName_default (must be the name of your Mail server!) and emailAddress_default and provide values specific to your setting. Our Mail servers hostname is mail.example.com and [email protected] is in charge.
commonName_default    = mail.sathish.com
emailAddress_default  = [email protected]
That’s it and it will save us a lot of typing as we will build not only one cert. Save the file and read on as we will have to edit yet another file.
Consider this: Usually certs are crypted. That’s a good idea when you take them along with yourself and the disc you have it on gets lost. It won’t be of any use to the finder unless that person also knows your secret passphrase… But then if you don’t take it with you, but leave it on a server this feature can become a real problem to the availability of your service. Why?
Any time you restart the server and the server wants to get its hand on the cert, the cert wants to be given the secret passphrase and the server hangs in there waiting to pass that task on its start list. And it waits and waits and waits… until you enter the secret passphrase at the command prompt. The bottom line is: No passphrase, no service.
So we will not create certs with secret passphrases, as we will not always be available when the server needs to be restarted or starts itself, say after a power failure.
In order to have certs that aren’t crypted we will have to add a parameter to the script that we run when we create a cert. So let’s cd to the directory that holds the script and create a backup first before we edit it.

#cd /etc/pki/tls/misc
#cp CA CA_nodes
#vi CA
Search for # create a certificate and add -nodes to the line below that begins with $REQ. When your done with this search for # create a certificate request and do the same again.
When your done it should look like this:
-newcert)
# create a certificate
$REQ -new -nodes -x509 -keyout newreq.pem -out newreq.pem $DAYS
RET=$?
echo “Certificate (and private key) is in newreq.pem”
;;
-newreq)
# create a certificate request
$REQ -new -nodes -keyout newreq.pem -out newreq.pem $DAYS
RET=$?
echo “Request (and private key) is in newreq.pem
;;

Generating the CA certificate
# ./CA_nodes -newca
Generating the server certificate
# ./CA_nodes -newreq
Signing the server certificate
# ./CA_nodes -sign


newreq.pem
This is the private SERVER CERT. We generated it in order to request an CA to sign it. It contains our private key.
newcert.pem
That is your public SERVER CERT. It has been signed by a CA in this case ourselves.
/etc/pki/tls/CA/cacert.pem
This is the CERT of the CA Authority. We created it when we made ourselves a CA.
#mkdir /etc/postfix/key
#cp newcert.pem /etc/postfix/key
#cp newreq.pem /etc/postfix/key
#cp /etc/pki/tls/CA/cacert.pem /etc/postfix/key
Configure SSL/TLS on Postfix
#vi /etc/postfix/mai.cf
###########SSL#############
smtpd_tls_auth_only = no
smtp_use_tls = yes
smtpd_use_tls = yes
smtpd_tls_CAfile = /etc/postfix/key/cacert.pem
smtpd_tls_key_file = /etc/postfix/key/newreq.pem
smtpd_tls_cert_file = /etc/postfix/key/newcert.pem
smtpd_tls_session_cache_database = btree:/etc/postfix/smtpd_scache
smtpd_tls_session_cache_timeout = 3600s
smtpd_tls_security_level = encrypt
###########CA###################
smtpd_tls_loglevel = 1
smtpd_tls_received_header = yes
tls_random_source = dev:/dev/urandom
tls_smtp_use_tls = yes
ssl_key_password = bhuvi

#postfix reload
# telnet mail.sathish.com 25
220 mail.sathish.com ESMTP Postfix (1.1.5)
EHLO sathish.com
250-mail.sathish.com
250-PIPELINING
250-SIZE 10240000
250-VRFY
250-ETRN
250-STARTTLS
250-XVERP
250 8BITMIME
STARTTLS
220 Ready to start TLS
Now when we send messages to the server SMTP AUTH will only be offered after the TLS layer has been established
Configure SMTPS
#vi /etc/services
#smtp 25/tcp
#smtp 25/udp
Smpts 465/tcp
Smtps 465/udp
#vi /etc/postfix/master.cf
#smtp inet n – n – – smtpd
smtps inet n – n – – smtpd
-o smtpd_tls_wrappermode=yes
-o smtpd_sasl_auth_enable=yes
-o smtpd_reject_unlisted_sender=yes
-o smtpd_recipient_restrictions=permit_sasl_authenticated,reject
-o broken_sasl_auth_clients=yes

#vi /etc/dovecot/conf.d/10-auth.conf
disable_plaintext_auth = yes
#vi /etc/dovecot/conf.d/10-mail.conf
mail_location = mbox:~/mail:INBOX=/var/mail/%u
#vi /etc/dovecot/conf.d/10-ssl.conf
ssl = yes
ssl_cert = /etc/postfix/key/newcert.pem
ssl_key = /etc/postfix/key/newreq.pem
#vi /etc/dovecot/dovecot.conf
protocols = imaps pop3s
#service postfix restart
#service dovecot restart
#service saslauthd restart
#chkconfig postfix on
#chkconfig dovecot on
#chkconfig saslauthd on
Installation & Configuration of Squirrelmail
#yum install squirrelmail
# vi /etc/httpd/conf/httpd.conf
Alias /squirrelmail /usr/share/squirrelmail
<Directory /usr/share/squirrelmail>
Options Indexes FollowSymLinks
RewriteEngine On
AllowOverride All
DirectoryIndex index.php
Order allow,deny
Allow from all
</Directory>
#service httpd restart
#cd /usr/share/squirrelmail
# cd config
# ./conf.pl
#perl conf.pl
• Now select option 1 (Organization Preferences).
Organization Name : SATHISH
Organization Title : SATHISH WELCOME YOU
Provider link : http://www.sathish.com
Provider name : ARTHAR
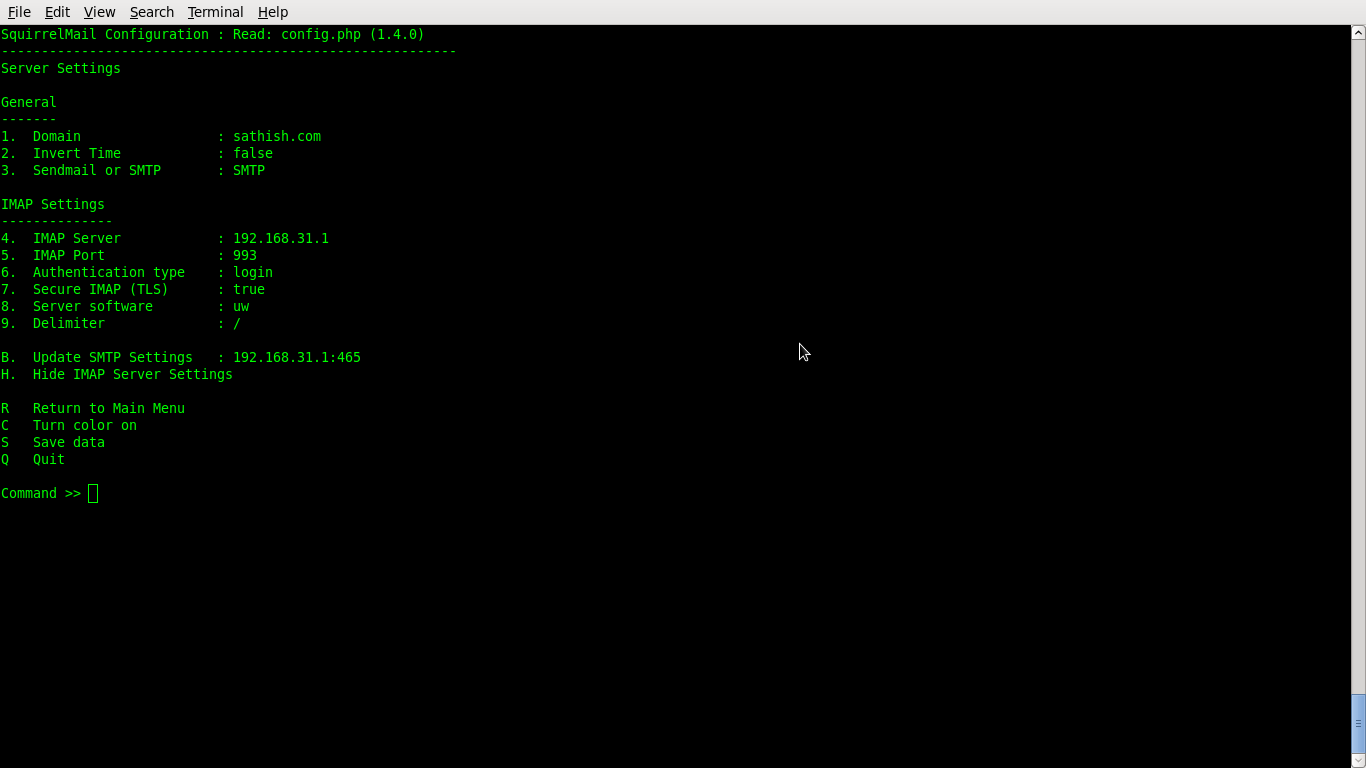
• Now select option 2 (Server Settings).
Domain : sathish.com
Sendmail or SMTP : SMTP
SMTP Server: 192.168.31.1
SMTP Port: 465
POP before SMTP: false
SMTP Authentication: login
Secure SMTP (TLS): true
IMAP Server : 192.168.31.1
IMAP Port : 993
Aythentication type: login
Secure IMAP (TLS) :true
Server software : uw
Delimiter : /
• Now select option 3 (Folder Settings).
Default Folder Prefix : mail/
Show Folder Prefix Option : true
Trash Folder : Trash
Sent Folder : Sent
Drafts Folder : Drafts
By default, move to trash : true
By default, move to sent : true
By default, save as draft : true
List Special Folders First : true
Show Special Folders Color : true
Auto Expunge : true
Default Sub. of INBOX : false
Show ‘Contain Sub.’ Option : true
Default Unseen Notify : 2
Default Unseen Type : 1
Auto Create Special Folders : true
Folder Delete Bypasses Trash : false
Enable /NoSelect folder fix : false
•Now select option 4 (General Settings).
Data Directory : /var/lib/squirrelmail/prefs/
Attachment Directory : /var/spool/squirrelmail/attach/
Directory Hash Level : 0
Default Left Size : 150
Usernames in Lowercase : false
Allow use of priority : true
Hide SM attributions : false
Allow use of receipts : true
Allow editing of identity : true
Allow editing of name : true
Remove username from header : false
Allow server thread sort : true
Allow server-side sorting : true
Allow server charset search : true
Enable UID support : true
PHP session name : SQMSESSID
Location base :
• Now choose option 8 (Plugins) and select the plugins that you wish to use


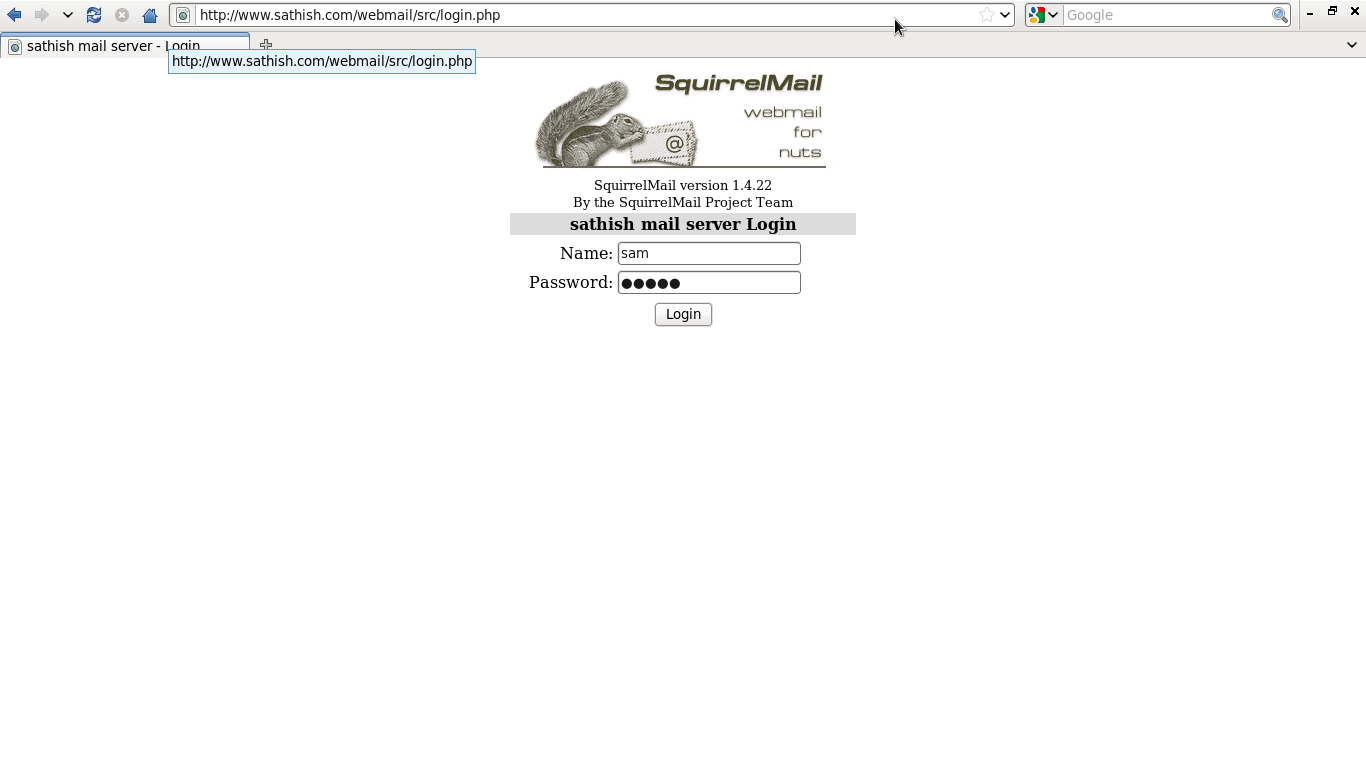

Open your browser
http://www.sathish.com/webmail


I’ll right away seize your rss as I can not to find your email
subscription link or newsletter service. Do you’ve any?
Please let me recognise in order that I may just subscribe.
Thanks.
Hi! Someone in my Myspace group shared this website with us so I came to check
it out. I’m definitely loving the information. I’m bookmarking and will be tweeting this to my followers!
Terrific blog and amazing design.
Hi there! I could have sworn I’ve been to this blog before but after reading through some of the post I realized it’s new to
me. Anyhow, I’m definitely delighted I found it and I’ll be
book-marking and checking back frequently!
Today i spent 300 $ for platinium roulette system , i hope that i will make my first $$ online
I need some urgent help, please reply back Sir.
Hello Sir, I need some urgent help, can you kindly reply me back ASAP.
What help you need?